NewChallengerStore.com
Dodge Challenger (2008-2012) Stainless Steel Vented Hood Panel
ACC-153001 - CHHP100
PARTS INCLUDED:
1- Stainless Vented Hood Panel
1- Small Rubber Tube Link
12- 3/8” #8 Pan Head Screws
12- White Nylon Washers
12- Chrome Screw Covers
Your hood panel comes to you with a protective liner. Do not remove liner until prompted by instructions.
This stainless steel hood panel is a beautiful addition to any show car. Polished to a mirror finish it will serve you by doubling the looks of your engine bay. Installs with a relatively simple installation that will require you to remove the entire hood from the car detach the factory hood pad and replace it with the stainless one. The stainless hood panel will provide an adequate thermal barrier to protect the outer surface paint.
1. Set up a table with a blanket to lay your hood on. Use a fine point marker and draw a line around each of the four bolts securing the hood. Snip the washer fluid tube just inside the wiper cowl by pulling the tube out a little. Doing this will allow you to hide the reattachment link under the wiper cowl.
2. With the help of two friends, one holds one side of the hood and the other holding the remaining side. Remove the four bolts as your friends securely hold the hood and then set it upside-down onto the blanketed table. Remove the factory hood pad.
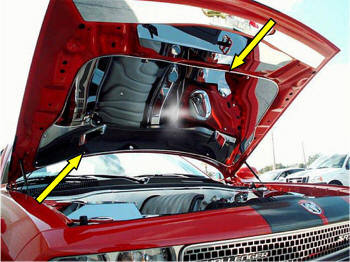
3. You will notice that the washer fluid tube runs to the left and down to the bottom left corner of the hood. In order to keep this same positioning the tube will need to be routed though the hoods sub frame to allow the new hood panel to set nice and flush with the hood sub frame. To do this drill a 1/4 hole at the first area that the tube approaches of the sub frame and then at the lower left hand corner. Tuck the rubber vent spout into the hoods sub frame. This will allow you to manipulate the black washer tubing through the first and second holes you just drilled. After doing so simply pull the rubber vent spout back up through the square opening and be sure that the rubber tabs of the spout are correctly reinstalled. PLEASE NOTE: It is important to know that the factory rubber spouts must be properly in place or the hoods sub frame could potentially fill with water during rain weather.
4. Carefully set the new hood panel in position. A friend would be very helpful in doing this due to the fact that the hood panel must place precisely over the rubber vent spouts. Once the hood panel is in position secure it by placing the 3/8 #8 pan head screws through the white nylon sockets provided and directly force the screw into the sub frame. The sub frame is a relatively thin gauge metal and the screw will self tap right in using a screw gun with the proper #2 Phillips bit. If you prefer you can also mark each of the hole locations remove the hood panel and pilot the hole with a 9/64'' drill bit. If you elect to do this be careful NOT to poke the outer skin of the hood. Also be sure to remove any and all drill shavings as this will cause rust and noise when raising and lowering the hood. Set all the center screws first and then the outer screw locations by the hinge bolt holes. Remove the protective liner and then snap on the chrome screw covers provided. NOTE: You may need to loosen some of the screws to release the liner.
5. Now that the hood panel has been installed simply reinstall the hood by installing the hood bolts first by hand to get all four in place. Then line up the bolts with the drawn line you drew earlier and thoroughly tighten.
6. You have been provided with a small rubber tube link. Attach this tube link onto one end of the cut washer fluid tube and then attach it to the other end of the tube to reconnect the washer fluid tube and finish the installation.
 CARE
AND MAINTENANCE:
CARE
AND MAINTENANCE:
Care must be taken when cleaning your
hood panel. It is a good idea to lightly dust your panel with a
clean soft cloth first in order to prevent any particles from
scratching it. Then wipe (using a new clean soft cloth) with a good
quality streak free glass cleaner.
For Help - please call 352 688 8160 M-F or email
us at admin@NewChallengerStore.com
NewChallengerStore.com a HotCarAccessories.com website
Not affiliated with
Dodge, Chrysler Corporation
or it's divisions.