NewChallengerStore.com
Dodge
Challenger (2008-2010)
Stainless Steel Seat Trim Plates
For Parts: #
ACC-CHSR507X,
ACC-CHSR506X, ACC-CHSR505X
INSTALLATION INSTRUCTIONS
Included: 1x Drivers side Seat Panel Trim, 1 x Passengers side Seat Panel Trim, 2 x Adhesive Promoter packets
First: One want to make sure that the seat panels you received are the ones that will fit your car. Hold the panels up to each seat to make sure the control cut outs match your seats. (If they don't - Stop - Call us.)
IMPORTANT: Before
you begin you must first prepare your door area where the piece(s) are to mounted in order to allow adhesion. You can do this
by scrubbing the entire area first with household isopropyl alcohol.
1. BEFORE YOU BEGIN YOU MUST FIRST PREP THE SURFACE IN ORDER
TO ALLOW ADHESION. You do this by scrubbing the entire area with
household Isopropyl Alcohol (or rubbing alcohol) found at your local
Wal-Mart or any hardware store. Scrub the are vigorously to
remove any hint of oil.
2. Once properly cleaned take the piece of test strip tape included and remove a portion of the back red liner. Stick the test tape strip to the area where you will be mounting your new trim. Test several areas. If it is tacky and sticks then proceed to the next step. If it is not sticking very well in any of the spots you tested then re-clean the area until the test strip sticks to all areas.
3. Without removing the rear red liner - Take your
Passenger Side Seat Panel Trim and
line it up carefully with seat control panel area.
Ensure the edges are evenly spaced around the seat control
panel area. If the piece(s) is not fitting perfectly - STOP.
Call us. Do the same for the Drivers side panel. Once
you remove the rear red liner you may not return the part.
4. Now that your interior
areas have been cleaned properly use the adhesive promoter packs/tubes
(provided) to wipe the areas of your seat where your new
stainless pieces will be mounted. This clear liquid is
odorless and will not stain or damage your paint or your interior
panels. Allow a few seconds to dry.
5. IMPORTANT: Before
you remove the liner for permanent attachment place each piece into
position and check the fit and also get acquainted with just how
each part sets in place. Some pieces may require a little hand
bending for a nice
perfect fit. Test it before removing the back red liner.
Ensure you line up the cut outs perfectly with the seat control
knobs. If
the trim piece is not fitting perfectly - STOP. Call us.
Now that you are satisfied with
the shape and fit peel the red release liner and gently set each
piece into position.
Make any final tiny adjustments. At this point you can
firmly press along the surface of the trim piece starting at the
center and working your way out.

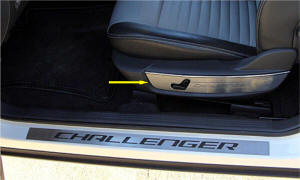
Power Seat Control shown in photos
NOTE: Extra care must be taken when cleaning your dash
kit. It is a good idea to lightly dust your kit with a clean soft
cloth first in order to prevent any particles from scratching it.
Then wipe (using a new clean soft cloth) with a good quality streak
free glass cleaner.
For Help - please call 352 688 8160
M-F or email
us at admin@NewChallengerStore.com