|
NewChallengerStore.com PART #153030
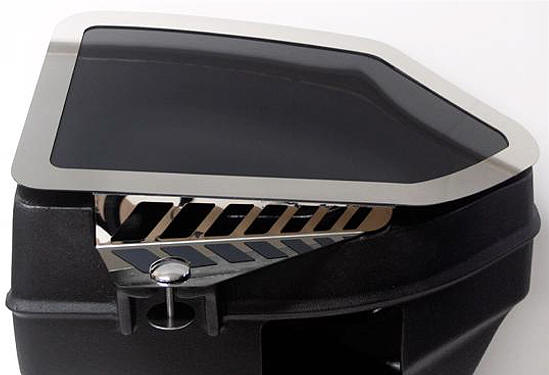
PARTS INCLUDED: 1-Plastic Cover w/Velcro INTRODUCTION: This new accessory is a unique and stylish part
designed to add an awesome custom look to what otherwise would be a
relatively unattractive air filter box. Please note that the cover
is strictly decorative and is not intended to seal the factory air
box. PROTECTIVE LINER INFORMATION: Your new accessories will come
to you with a protective surface liner. Leave this liner in place
until the installation is complete to prevent finger prints and/or
possible scratches during installation. 1. The first step for this installation will be to prepare the
air box to receive the new accessory by removing the rubber gasket
attached to the air box top ridge. (Note: This gasket will not be
reused). 2. You will notice that the air box is fastened to the vehicle
with one single bolt located at the top front area of the box and
that this bolt has been sleeved with a steel sleeve encapsulated
with a rubber grommet. Remove this bolt. Then remove the rubber
grommet from the air box. (Note: This grommet will not be reused).
3. Lift the plastic box out of its valley in the engine bay just
enough to allow you to see the rubber grommet or grommets that the
plastic box seats into and remove those grommets. (Note: These
grommets will not be reused). 4. Set the air box back into position. The idea here has been to
effectively settle the air box to a lowered position by removing
these grommets thusly creating clearance for the new top plate
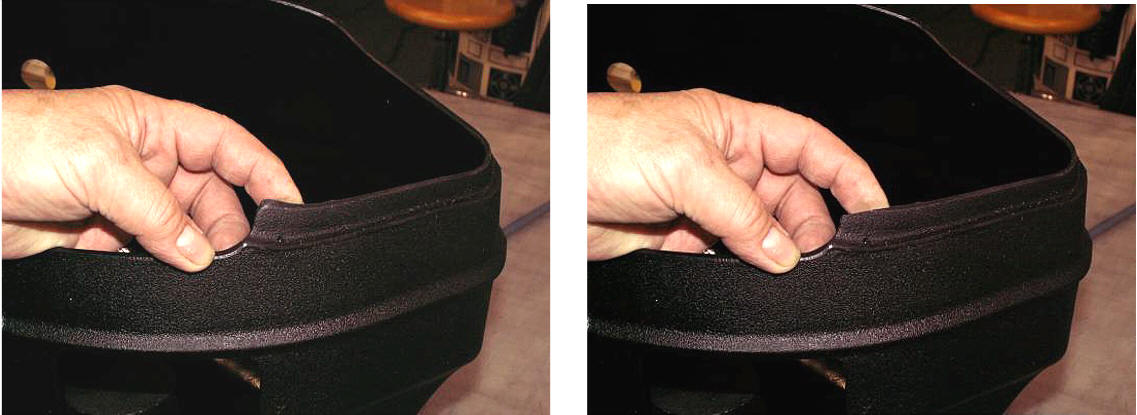
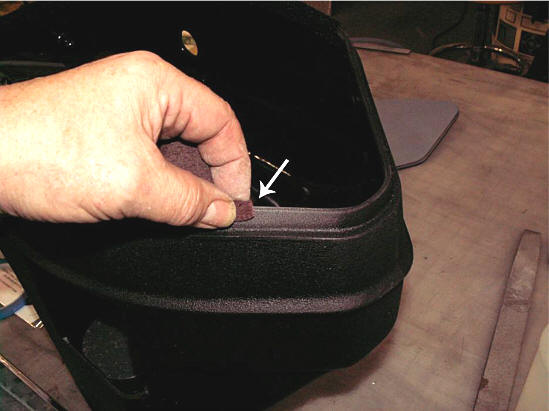
between the air box and hood. 5. You will notice that the air box contains a rounded corner at
the left side of the front opening as well as an area to the right
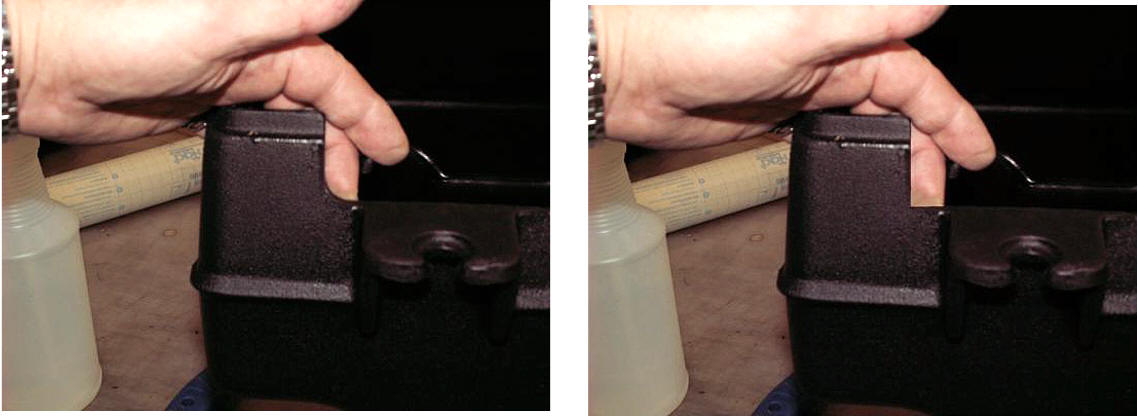
that will appear uneven along the top ridge. SEE PICTURE 1 & 2 6. Because this is uneven you will need to lightly file these two
areas in order to allow the new cover to fit comfortably into
position. First file the rounded corner to the left of the front
opening to a sharp 90 degree corner. Then file the top right of the
air box ridge so that it will no longer contain an uneven bump in
the rim and look nice and straight. SEE PICTURE 3, 4, 5 Although the new cover will not completely set flush to the top
of the air box due to is inconsistent shape and contour performing
these two light modifications will allow the new cover to sit very
nicely into place. 7. Once these procedures are complete, you can now set up the top
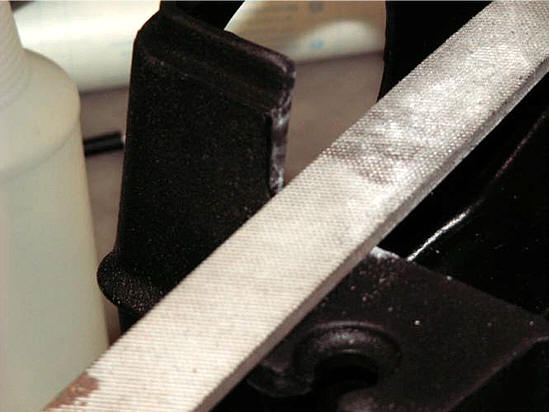
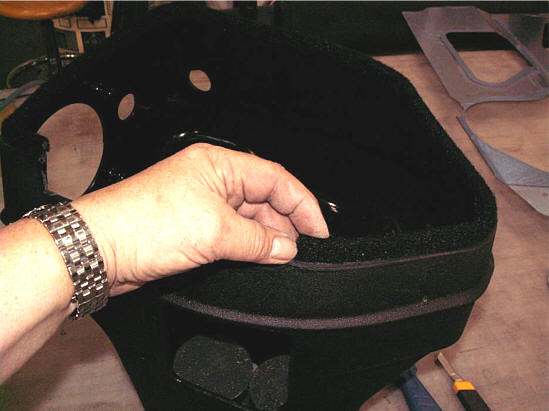
ridge for the new cover. You have been provided with a small piece
of scratch pad. Use this pad to thoroughly scuff the outer and inner
sides of the upper ridge that runs along the entire circumference of
the air box. SEE PICTURE 6. 8. Once this is done scrub the ridge with rubbing alcohol to
remove the dust and also to clean the ridge. Then swipe both the
inner and outer sides of the ridge with the adhesive promoter packet
provided. This packet is NOT a cleaner but and an adhesive
accelerator and must be used as such in order to successfully and
permanently attach the 32.5" length of furry Velcro supplied with
your kit. Once the ridge is prepared, peel the release liner
completely from the Velcro strip and place the end of the strip
along the ridge, starting at the front left side and then along the
entire box until you reach the other end. Trim away any excess if
necessary. At this point the Velcro will be standing straight up on
the ridge and you can now fold the Velcro over the ridge to the
inside of the box. (Tech Note: Before you fold the Velcro over, slit
the Velcro at all four corners with a razor blade. This will allow
you to fold the Velcro more easily and eliminate wrinkles in the
process.) Press firmly along the entire ridge to set the bond of the
Velcro. SEE PICTURE 7. 9. Now you are ready to install your new cover. You will notice
that your new cover has Velcro attached to the underside of the
covers frame and the window is slightly elevated. Remove the
protective liner from the window and then place the frame so that
the window will set into the air box ridge allowing the Velcro to
seat the window securing it in place. Although it should not be
necessary you may need to tweak the shape of the top cove a little
in order to achieve a nice contoured fit. 10. Remove the remaining protective liner. You have been provided
with a large 1.25" Washer head type bolt nut and washer. This bolt
has been proved as a replacement bolt for the factory one. Depending
on the production date of your Challenger this new bolt may slip
through the existing welded nut at the front of the air box, in
which case we have provided a new nut and washer to be placed under
the factory tab allowing you to secure the new cover’s mounting tab.
Then simply cover the new bolt head with the decorative chrome cap
cover. This cover will have a butyl putty attached, simply remove
the release tape and press it onto the bolt head to finish the
installation. (Note: Some Challenger models use a smaller bolt and
nut to secure the air box.) If this is the case you can elect to
either drill the factory bolt with a ¼" drill bit to allow the new
bolt to be set through the factory nut (recommended) or you can use
the original bolt to secure the new cover or you can re-tap the
factory nut with a ¼" 20 taping bit. If you have any questions during installation please call
American Car Craft at 727 861-1500. Additional Installation Tips from a customer… I installed the air box cover on my Mopar air box and thought I
would share my comments. Overall, I am very satisfied and perhaps my
suggestions would benefit others or allow you to update your
documentation. After a thorough review of the instructions, I found a couple of
deviations and enhancements that were beneficial during the process.
First and foremost, is the complete removal of the filter and box
from the vehicle as the majority of the work needs to be done on the
bench. This keeps plastic shavings and sanding residue away from the
filter, throttle body area and under-hood in general. Instead of a file, I used a very sharp utility knife to trim the
plastic as outlined in the instructions. After some test fits, I
also removed some plastic from the top ridge on the left side
(throttle body side) near the front to level out this area somewhat.
After smoothing the reworked areas and scuffing the top ridge, I
gave the entire box a thorough cleaning and drying to remove all
fine particles. After applying adhesion promoter, the Velcro strip
went on very nicely with the trim and slitting as instructed. After a little warming and flexing of the stainless frame, I
achieved a nice complete velcro seal all around the box. Note, I had
not yet removed any protective film from the cover. Next was the fitting and bolting of the box. I was not planning
to use the supplied washer and nut under the mount bracket as it
became evident that these would be hard to reach during future
maintenance, not to mention possibly dropping them into under-hood
voids. The supplied bolt allowing for the finished cap is standard
thread while the nut on the box mount is metric. I simply replaced
the factory push nut with a standard thread push nut. Then, I thought I would try the fitment with the stock grommets
in place which isolate the box from vibration, rattles etc. Using
plumbers putty at 5 points around the box and sheet of protective
plastic on top, I was able to determine up to 3/4 inch clearance
from top of cover to hood underside with hood closed. This confirmed
that on my 2011 Challenger, both grommets could stay in place. I purchased a Mopar decal part number 82212434. This is designed
to be placed on the inside of the quarter window glass and give an
etched-in appearance from the outside. After removing the underside
protective film, I affixed the decal in the tapered corner. See
photo. With cover in place, I removed the top layers of protective
film. To my surprise, the plexi panel had a smoke look despite the
product info describing it as clear. I would have opted for clear
had I known there was a choice although I am very satisfied with
result. Perhaps you could give future customers the option of clear
or smoke. Per the care sheet, I acquired all suggested cleaning and waxing
materials and applied the quick wax. Thanks again for the great service and speedy delivery. I will
refer others to your site as you have some super looking products
for many popular vehicles. Looking forward to a season of cruises and shows to "show off"
this beautiful accessory.
|