NewChallengerStore.com
Dodge
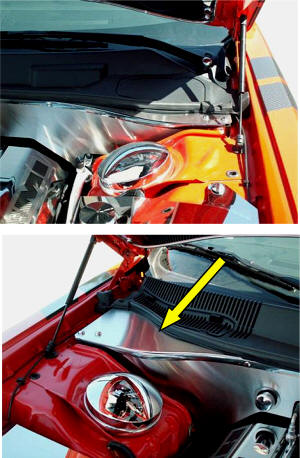
Challenger RT or SRT8 (2008-10)
Polished
or
Brushed
Stainless 2pc Firewall Extensions
For Part: #ACC-153020
& ACC-153021
INSTALLATION
INSTRUCTIONS
PARTS INCLUDED:
Parts Included:
2 x Stainless Top Plates
1 x Cobalt Drill Bit
4 x #8 3/8” Pan Head Screws
4 x White Nylon Sockets
4 x Chrome Screw Covers
 Introduction:
These new extensions have been specifically designed for use with
the Challenger Firewall only.
Introduction:
These new extensions have been specifically designed for use with
the Challenger Firewall only.
Liner Information: Your new accessories will come to you with a protective surface liner. Leave this liner in place until the installation is complete to prevent finger prints and or possible scratches during installation.
1. Your Challenger may contain a factory mounted cover attached to the passenger side of the wiper cowl area. This plastic cover will have to be removed and will not be reused for this application.
2. Place each of the two extensions in position and adjust their shape so that they contour to the cowl area as well as the mounted firewall. This can be done by gently forming the panels with your fingers until they match their placement.
3. Once they have been
nicely formed you will notice that the two holes in each panel will
line up with the factory bolt heads. Mark this exact spot with a
silver marker to confirm their exact location on the bolt head then
remove the two panels. Using the small double ended cobalt drill bit
provided drill a pilot hole a little over a 1/4 '' down into the
bolt head and blow away the shavings. This will create an exact
mounting hole location for the two panels. Once this is done simply
place the panels back into position and then secure them with the
3/8” #8 pan head screws provided. Place each of the screws through
the white nylon socket and snug them down. Once this is done simply
snap the chrome decorative cover over the four screws. Remove the
protective liner to finish the installation.
For Help - please call 352 688 8160
M-F or email
us at admin@NewChallengerStore.com
NewChallengerStore.com a HotCarAccessories.com website
Not affiliated with
Dodge, Chrysler Corporation
or it's divisions.